by Deborah in NC

This tutorial was written and designed by Deborah on January 29, 2010.
Any resemblance to other tutorials available is coincidental.
Skill Level: Intermediate
Supplies Needed:
PSP (written in PSP X3, will work in other versions)
These items are in the zip file found here
-~~~dkj_crumpled heart (Mask - place in your Masks folder)
-bowhearts1-sandi
-lz.perfectly pink
-ma1_msvalentineqe
-You will also need a font of choice (I used Auld Town Script) - included in zip file
-bowhearts1-sandi
-lz.perfectly pink
-ma1_msvalentineqe
-You will also need a font of choice (I used Auld Town Script) - included in zip file
No outside plugins are used in the tutorial.
All settings, unless otherwise stated remain the same.
All settings, unless otherwise stated remain the same.
Method:
Step 1.
Open PSP.
Step 2.
Open font, if using mine, and minimize to taskbar. Windows 7 users - you will probably have to install the font.
Step 3.
Open the 3 tube images in PSP. Minimize for now.
Step 4.
Select two colors for your material palette, they can be from the tubes or your own choice.
One light, set as your Foreground color (I used #dfc0f4)
One medium, set as your Background color (I used #f9617e)
One light, set as your Foreground color (I used #dfc0f4)
One medium, set as your Background color (I used #f9617e)
Step 5.
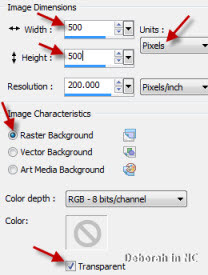
File>New
Settings: Width & Height: 500, Raster & Transparent: checked
Settings: Width & Height: 500, Raster & Transparent: checked
Step 6.
Flood fill tool (Default settings) and flood fill the new image with Foreground color

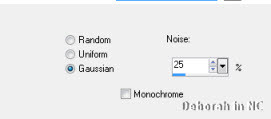
Adjust>Add/Remove Noise>Add Noise: Gaussian: checked, Noise: 25, Monochrome: checked
Step 7.
Layers>New Raster Layer
Flood fill with Background color
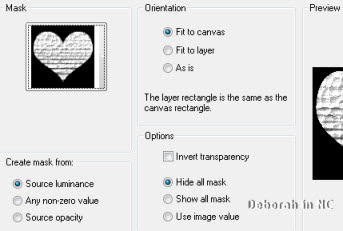
Layers>Load/Save Mask>Load mask from disk
Locate ~~~dkj_crumpled heart in the pulldown menu
Settings: Source luminance: checked, Fit to Canvas: checked, Invert transparency: UNchecked, Hide all mask: checked. Load.
Flood fill with Background color
Layers>Load/Save Mask>Load mask from disk
Locate ~~~dkj_crumpled heart in the pulldown menu
Settings: Source luminance: checked, Fit to Canvas: checked, Invert transparency: UNchecked, Hide all mask: checked. Load.
Layers>Merge>Merge group
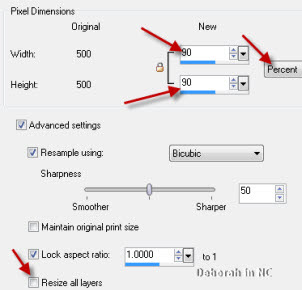
Image>Resize: 90, Percent, Resize all layers: Unchecked
Step 8.
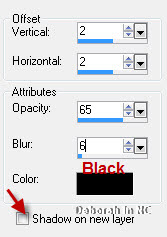
Effects>3D Effects>Drop Shadow: 2, 2, 65, 6, Black, Unchecked
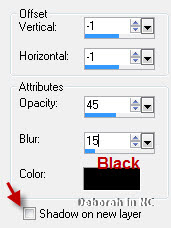
Effects>3D Effects>Drop Shadow: -1, -1, 45, 15, Black, Unchecked
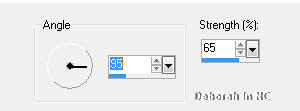
Adjust>Blur>Motion Blur: 95, 65
Effects>Edge Effects>Enhance
Repeat Effects>Edge Effects>Enhance
Step 9.
Maximize lz.perfectly pink
Edit>Copy, close original
Edit>Paste>Paste as new layer
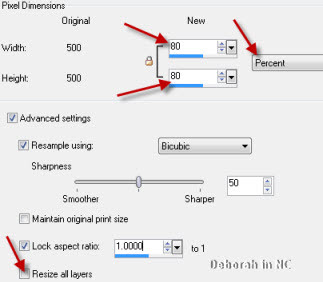
Image>Resize: 80%, Resize all layers: UNchecked
Edit>Copy, close original
Edit>Paste>Paste as new layer
Image>Resize: 80%, Resize all layers: UNchecked
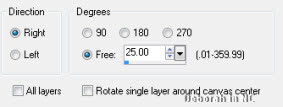
Image>Free Rotate: Right, 25, nothing else checked
Move to top left part of the heart (see my header for example)
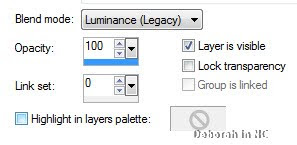
Layers>Properties>Blend mode: Luminance (Legacy)
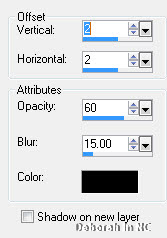
Effects>3D Effects>Drop Shadow: 2, 2, 60, 15, Black, UNchecked
Step 10.
Maximize bowhearts1-sandi
With mover tool, select one of the hearts that match your color selections (I used the pink one)
Edit>Copy, Close original
Edit>Paste>Paste as new layer
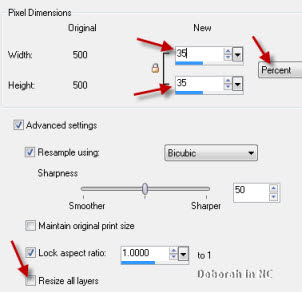
Image>Resize: 35%, Resize all layers: Unchecked
With mover tool, select one of the hearts that match your color selections (I used the pink one)
Edit>Copy, Close original
Edit>Paste>Paste as new layer
Image>Resize: 35%, Resize all layers: Unchecked
Mover tool, move to the top right heart (see my header for placement)
Note: You can colorize if you want to match your color choices. I used Manual Color Correction: Settings: Manual target color: checked, Source: the main pink color in the tube (#fabfe0), Target: Background color
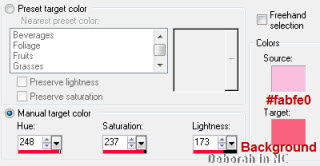
Effects>3D Effects>Drop Shadow: same settings as before
Step 11.
Maximize ma1_msvalentineqe
Edit>Copy, Close original
Edit>Paste>Paste as new layer
Image>Resize: 60%, Resize all layers: Unchecked
Edit>Copy, Close original
Edit>Paste>Paste as new layer
Image>Resize: 60%, Resize all layers: Unchecked
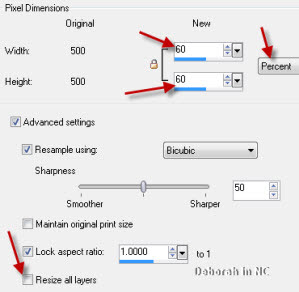
Effects>3D Effects>Drop Shadow: same settings as before
Mover tool, move to bottom right corner
Mover tool, move to bottom right corner
Step 12.
Activate Text tool.
Add text as desired (I used Auld Town Script, Size 48, pixels, Bold, Centered, Direction: Vertical and Left, Anti-alias: Sharp, Width: 1, Vector: Selected, Line Style: Solid, Warp text: checked, Auto kern: checked, Kerning: 0)
Add text as desired (I used Auld Town Script, Size 48, pixels, Bold, Centered, Direction: Vertical and Left, Anti-alias: Sharp, Width: 1, Vector: Selected, Line Style: Solid, Warp text: checked, Auto kern: checked, Kerning: 0)

I used "Love" for mine, but feel free to add whatever you wish.
Optional: Then I clicked on the vectored text layer + sign in the front, to open the vector layer up.

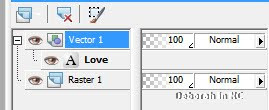
Objects>Convert Text to Curves>As character shapes.

Click on the new + sign, to open up the individual letter layers.
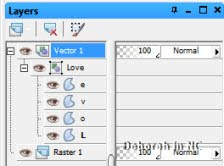
Click on the L, a vector box will appear around it, the L only, click on the center node and move to place.

Click on each of the remaining letters layers, and move to position.
To move the word or words at one time, click on the named vector layer and vector box will appear around the whole word.
To move the word or words at one time, click on the named vector layer and vector box will appear around the whole word.
Step 13.
After you have positioned the letters where you want, Layers>Convert to Raster layer
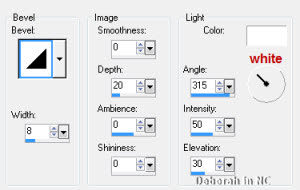
Effects>3D Effects>Inner Bevel: #1, 8, 0, 20, 0, 0, white, 315, 50, 30
Effects>3D Effects>Inner Bevel: #1, 8, 0, 20, 0, 0, white, 315, 50, 30
Effects>3D Effects>Drop Shadow: same settings as before
Step 14.
Layers>Merge>Merge all (flatten)
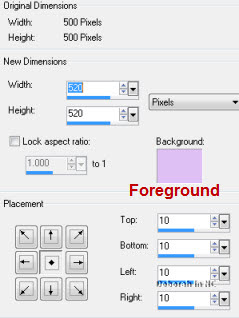
Image>Canvas Size: Width and Height: 520, Color: Foreground, Centered
Image>Canvas Size: Width and Height: 520, Color: Foreground, Centered
Magic Wand: Settings: Mode: Replace, Match Mode: RGB Value, Tolerance: 0, Use all layers/Sample merged: UNchecked, Contiguous: checked, Feather: 0, Antialias: checked, Outside: selected

Apply Magic Wand inside the newly created edge
Adjust>Add/Remove Noise>Add noise: as before
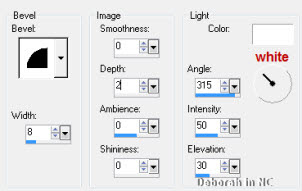
Effects>3D Effects>Inner Bevel: #2, 8, 0, 2, 0, 0, white, 315, 50, 30
Selections>Float
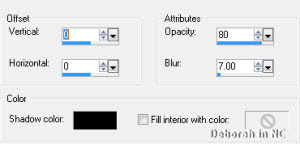
Effects>3D Effects>Cutout: 0, 0, 80, 7, black, Unchecked
Selections>Select None
Step 15.
Image>Add Border: Symmetric: checked, Top: 5, Color: Background
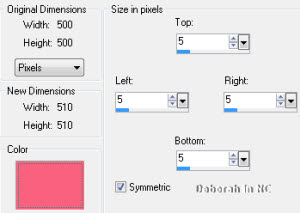
Apply Magic Wand inside the newly created edge
Effects>Reflection Effects>Pattern: 0, 0, 90, 0, 3, 3, 0, 0
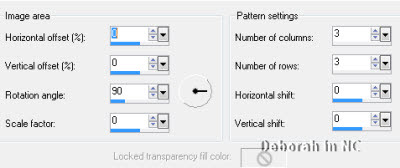
Effects>Edge Effects>Enhance
Selections>Select None
Selections>Select None
Step 16.
Image>Add Border: Symmetric: checked, Top: 10, Color: Foreground
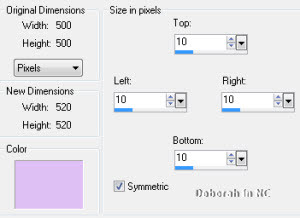
Apply Magic Wand inside the newly created edge
Adjust>Add/Remove Noise>Add noise: as before
Effects>3D Effects>Inner Bevel: #2, 8, 0, 2, 0, 0, white, 315, 50, 30
Selections>Float
Effects>3D Effects>Cutout: 0, 0, 80, 7, black, Unchecked
Selections>Select None
Step 17.
Layers>New raster layer
Add watermark
Add watermark
Step 18.
Image>Resize to desired size
Step 19.
File>JPG optimizer: Compression: 20
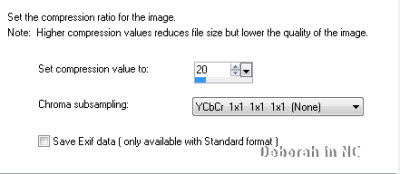
Locate folder to save in
Name your file
Save
Name your file
Save
That's it you have now done your Valentine.
I hope you have enjoyed this tutorial, and thank you for trying it. If so, feel free to leave a comment, they are nice to see but not required.
LEGAL INFO:
This tutorial was written and designed by Deborah on January 29, 2010, and is made using teaching and tips gained from the web and PSP, Animation Shop, and the other programs used, these programs listed Help feature; and is my own creation. Any resemblance to other tutorials available is coincidental.
Please do not share this tutorial or to place it on any web site without my written permission.
Please do not translate this tutorial into any other language without my written permission: kay2ndjackson@gmail.com.
If sharing, please direct to my blog site at: http://deborahscornerincyberspace.blogspot.com/
Mask by Deborah in NC
Tubes by Mary, and unknown, through group shares


