Monday, December 27, 2010

New Year Greeting

New Year Greeting
by Deborah in NC



Supplies Needed:
PSP (written in PSP X3, will work in other versions)
Zip File is 
-aclis_ny_25_12_2008
-mjnewyear008
-NYG pattern
-PlumaSegunda


Plugin Used

Mystic Nights>Frosted Glass - 
Simple>Diamonds -
Italian Editor Effects>Disturbo Zoom -


Getting It All Together


1. Install Plugins before opening PSP

2. Open PSP
Open the tubes in PSP and minimize

3. Material Palette
Foreground: #b8c6e8
Background: #263a72
Or use colors of own choice. A very light color for the Foreground, and a dark color (in the same color family as the foreground color)

4. Change Foreground to Gradient
Settings: Foreground/Background, Angle: 45, Repeats: 3, Invert: Unchecked, Linear selected

5. Change Background to Gradient
Settings: Foreground/Background, Angle: 45, Repeats: 3, Invert: Unchecked, Radial selected, Center Point; Horizontal & Vertical: 50, Focal Point; Horizontal & Vertical: 50, Link center and focal points

6. Open font in font viewer of choice and minimize


Method


1. File > New Image: Pixels: Selected, Width: 500, Height: 400, Raster & Transparent: Checked
Flood fill tool (default settings) and Flood fill new image with Foreground gradient

2. Raster > New raster layer
Flood fill with Background gradient
Layers > Properties: Change Blend Mode: Overlay

3. Layers>Merge>Merge Visible

4. Maximize aclis_ny_25_12_2008, activate mist layer
Edit>Copy
Minimize

5. Back to working copy
Edit > Paste as new layer

6. Layers > Properties: Change Blend Mode: Overlay

7. Layers > Merge > Merge Visible

8. Effects > Image Effects > Seamless Tiling: Default settings

9. Effects > Plugins > Mystic Nights > Frosted Glass
Settings: 15, Custom Colors: 1st square: white, 2nd square: #d7d9cf, rest of squares: black

10. Layers>New raster layer
Edit > Paste as new layer (your mist layer)

11. Move Tool, move to right side

12. Maximize mjnewyear008
Edit > Copy

13. Back to Working Copy
Edit > Paste as new layer

14. Resize to fit in the top left corner (I used 40%, Resize all layers: Unchecked)

15. Image > Mirror

16. Adjust > Sharpness > Sharpen

17. Move tool, move to top left corner

18. Material Palette: Change BG to pattern
Settings: NYG pattern, Angle: 0, Scale: 65

19. Material Palette: Change FG to null

20. Activate Text Tool
Font: PlumaSegunda, Size will vary based on version of PSP (I used 72), Create as Vector, the other settings are your preference

21. Add text of choice, I typed my first Word, then applied it, then the 2nd word, finally the 3rd word
Since it is Vector, click on the plus sign of "Vector" Layer
This will expand the Vector layer so you can see all the layers
Click on the one you want to adjust and the nodes will appear around the text

22. Use center node to position text where you want
Repeat for all lines of text you added

23. Effects > 3D Effects>Drop Shadow
Settings: 3, 3, 80, 3, Black, Unchecked

24. Repeat Drop Shadow

25. Activate top hat layer
Effects>3D Effects>Drop Shadow
Settings: Settings the same, Except change Blur: 10

26. We will be adding some borders here, and the setting Symmetric will stay checked
Image>Add borders: 2, select BG, then I changed the color to a darker color of my BG color (#131725)

27. Image > Add borders: 10, Foreground

28. Image > Add borders: 2, darker BG

29. Image > Add borders: 10, White

30. Image > Add borders: 2, darker BG

31. Image > Add borders: 10, BG (original)

32. Image > Add borders: 2, darker BG

33. Magic Wand
Settings: Mode: Add (Shift), Match mode: Tolerance: 0, Sample Merged/Use all layers: Unchecked, Contiguous: Checked, Feather: 0, Anti-alias: Checked, Outside: Outside: Selected

34. Select the white border with the magic wand

35. Flood fill with Foreground Gradient
Do not Deselect

36. Maximize the mjnewyear008 image
Edit > Copy
Close original

37. Back to working copy
Edit > Paste into Selection (into the white border)

38. Effects > Plugins > Simple > Diamonds

39. Effects > Plugins > Mystic Nights > Frosted Glass: settings as before

40. Effects > 3D Effects > Inner Bevel
Settings: #2, 5, 0, 5, 0, 0, White, 315, 50, 30

41. Selections > Select None

42. Magic Wand the 10 pixel outer dark border

43. Selections > Modify > Contract: 3

44. Effects > 3D Effects > Inner Bevel
Settings: as before

45. Selections > Modify > Expand: 3

46. Effects > 3D Effects > Inner Bevel
Settings: as before

47. Selections > Select None

48. Magic Wand inside the light blue 10 pixel border

49. Effects > Plugins > Italian Editor Effects > Disturbo Zoom: Default settings (0, 0, 213)

50. Effects > 3D Effects > Inner Bevel
Settings: as before

51. Effects > 3D Effects > Drop Shadow,
Settings: as before

52. Effects > 3D Effects > Drop Shadow
Settings: change only the Vertical &; Horizontal: -3

53. Selections > Select None

54. Layers > New raster layer

55. Add watermark
Layers > Merge > Merge All (flatten)

56. Resize to desired use

57. Jpeg and save


I hope you have enjoyed this tutorial, and thank you for trying it. If so, feel free to leave a comment, they are nice to see but not required.


LEGAL INFO:
This tutorial was written and designed by Deborah and is made using teaching and tips gained from the web and PSP, Animation Shop, and the other programs used, the programs listed Help feature; and is my own creation.
Any resemblance to other tutorials available is coincidental.
Please do not share this tutorial or to place it on any web site without my written permission.
Please do not translate this tutorial into any other language without my written permission: kay2ndjackson3@gmail.com.
If sharing, please direct to my blog site at: http://deborahscornerincyberspace.blogspot.com/


Graphics: artists unknown, if yours, please let me know so I can give you proper credit
Tuber: Champagne: ACLIS
http://www.aclisdesigns.com.ar

Written: 12-19-10


Thursday, December 23, 2010

DCIC Piglet

DCIC Piglet

Finally, here are the Piglets. There are 15 Piglets; 3 poses in 5 colors; and includes the hut & fence.


DCIC Pig

DCIC Pig

Here is the 2nd set, this one is the Pigs, and this contains 20 Pigs; 4 poses/5 colors; as well as the hut and fence.


Download at:

4-Shared - here

Enjoy!!!

Deborah

DCIC Boar

DCIC Boar

Had a request for some real life pigs, so this and the next 2 posts will be some that I created with DAZ. These are the Boars, includes 15; 3 poses in 5 colors, as well as a hut and fence piece.


Download at:

4-Shared - here

Enjoy!!!

Deborah

Wednesday, December 22, 2010

DCIC Miss Piggy

DCIC Miss Piggy

More Little Piggy's for you, this time some cute little ladies. There are 14 total, all the same pose, but with different outfits. After all, we ladies have to look our best, right? :)


These are available for download at:

4-Shared - here

Enjoy!!!

Deborah

Tuesday, December 21, 2010

DCIC Snowmen of Winter

DCIC Snowmen of Winter

Just a few Snowmen for you today. Made these a few weeks ago, just didn't share them yet. Trying to clean out some folders, and found them. There are 4 snowmen for you.


They are available for download at:

4-Shared - here

Enjoy!!!

Deborah

Monday, December 20, 2010

DCIC 3 Lil Pigs

DCIC 3 Lil Pigs

Some more Fairytale Critters for you, this time, The 3 Little Pigs, and a Big Bad Wolf. This batch contains the 5 images shown in the preview below. Have fun with them.

The Cottage I uploaded earlier should work with them as well.


Available for download at:

4-shared - here

Enjoy!!!

Deborah

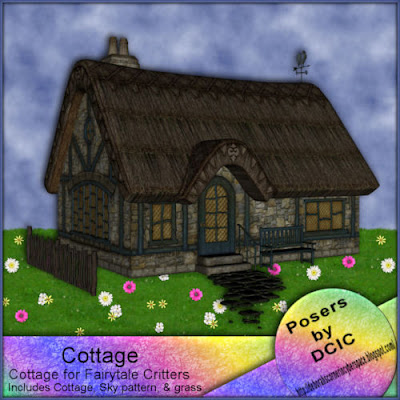
DCIC Fairytale Cottage

DCIC Fairytale Cottage

Here is a cute cottage to go with the Fairytale Critters I am sharing. I hope you like and can use.
The zip file contains, the Cottage Image, a sky seamless tile background, and a grass with flowers PSP image.


Available for download at

4-shared - here

Enjoy!!!

Deborah

DCIC 3 Bears

DCIC 3 Bears

Couldn't sleep, so played in DAZ and came up with these cuties for you, The 3 Bears. Thought they were adorable when I got them several months back, but didn't get to them right away. Three of the outfits are from a very talented lady (trumarcar) at Treasure Chest.

I hope you enjoy them.


The zip file is available for download at 4-Shared links are below.


4-shared - here

Enjoy!!!

Deborah

Tuesday, December 14, 2010

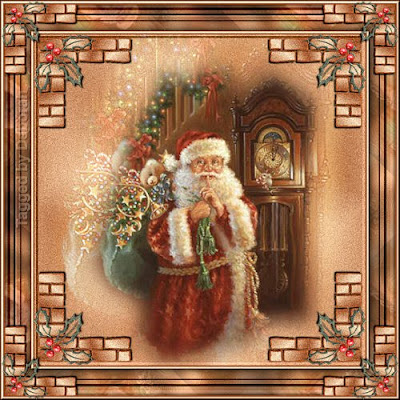
Magical Moment

Magical Moment
by Deborah in NC


Supplies Needed:

PSP (written in PSP X3, will work in other versions)
-!!!dkj_10_holly_berries
-JC_ DGelsinger-Santa (tube was shared through Tag Along Tubes)
-KR Lots Of Holly (Font)
-krcorners (Font)

All supplies listed above are included in the zip file Here

Plugins used:

Simple>Diamonds, Pizza Slice Mirror
Greg's Factory Output II>Pool Shadow
Bordermania>Frame #2

Preparation:

Open PSP

1. Open JC_ DGelsinger-Santa in PSP
In layer palette, turn off the watermark layer (Raster 2), click on the eye image and a red x will appear over it
Click on to activate bottom (mist) layer (Raster 1)
Edit>Copy
Minimize for now

2. Open !!!dkj_10_holly_berries in PSP
Minimize for now

3. Open KR Lots of Holly font in font viewer of choice

4. Open krcorners font in font view of choice

5. From your tube image select two color for material palette with dropper tool
Foreground (FG), choose a light color (I used #ffdab4)
Background (BG), choose a medium color (I used #9b4919)
Change Foreground to Gradient, Foreground-Background Gradient
Settings:
Angle: 45
Repeats: 11
Invert: Unchecked
Radial: selected
Center Point & Focal Point Horizontal & Vertical: all at 50
Link center and focal points: checked


PATTERN
First we will create our pattern. This can be used later to assemble a background for letter or stat in Letter Creator of choice

1. File>New: Width & Height: 350, Pixels: selected, Raster & Transparent: Checked

2. Flood fill tool
Settings:
Match Mode: None
Sample Merged/Use all layers: Unchecked
Blend mode: Normal
Opacity: 100

Flood fill image with FG (Gradient)

3. Selections>Select All
Selections>Modify>Contract: 65
Edit>Paste into Selection (this is your JC_ DGelsinger-Santa tube image. It should still be in your clipboard, if not, re-maximize and Edit>Copy. Minimize. Then do this step)
Selections>Select None

4. Effects>Image Effects>Seamless Tiling: Default settings

5. Adjust>Blur>Gaussian Blur: 15

6. Effects>Plugins>Simple>Diamonds

7. Effects>Plugins>Simple>Pizza Slice Mirror

8. Effects>Texture Effects>Soft Plastic: 100, 97, 128, 45, FG (light color)

9. Effects>Plugins>Simple>Diamonds

10. Effects>Plugins>Simple>Pizza Slice Mirror

11. Effects>Plugins>Greg's Factory Output II>Pool Shadow: 50, 50, 50, 50, 50, 50, 50, 135

12. Selections>Select All

13. Layers>New raster layer

14. Edit>Paste into selection

15. Layers>Properties
Change Blend Mode: Luminance (Legacy)
Change Opacity: 35

16. Layers>Merge>Merge Visible

17. JPEG optimizer, and save to location of choice

CORNER Accent

1. File>New
Width & Height: 350, Pixels: Selected, Raster & Transparent: Checked

2. Activate Text tool
Font: krcorners
Size: will depend on your version PSP, I used 400, Pixels: Selected
Font Style: B selected
Stroke width: 1.0
Create as: Vector

3. Material Palette, switch FG & BG colors

4. Type in " b" (lower case b without the quotes) and apply

5. Objects>Align>Center in Canvas

6. Layers>Convert to raster layer

7. The brick area will be open and needs to be filled in.
Activate your Magic Wand Tool
Settings:
Mode: Add (Shift)
Match mode: RGB Value
Tolerance: 0
Sample Merged/Use All layers: Unchecked
Contiguous: Checked
Feather: 0
Antia-alias: Checked
Outside: Selected

8. Apply magic wand inside each empty brick area

9. Activiate bottom layer in layer palette

10. Flood fill with FG (gradient)

11. Adjust>Add/Remove Noise>Add noise
Gaussian: Checked
Noise: 30
Monochrome: Checked

12. Selections>Select All

13. Adjust>Sharpen>Sharpen if desired

14. Activate top layer in layer palette

15. Selections>Select All
Selections>Float
Selections>Defloat

16. Effects>3D Effects>Inner Bevel: #2, 3, 0, 2, 0, 0, White, 315, 50, 30

17. You can add noise to this if you want, and sharpen as before, if desired

18. Layers>Merge>Merge visible

HOLLY ACCENT

1. Still working on the brick image, we will add holly to it.
Activate the Text Tool again.
Font: KR Lots Of Holly
Size: 300 pixels, again size will depend on the version of PSP you are using.

2. Material palette; change BG to a green color of choice (I used #414f3f)

3. Apply the holly image you wish to use (I used f (Lower case))
Layers>Convert to raster layer
Then I resized the layer 80% so it would fit where I wanted to place the holly on the corner image
Once I resized, I Sharpened it (Adjust>Sharpness>Sharpen)

4. Effects>Plugins>Greg's Factory Output II>Pool Shadow: same settings as before

5. Adjust>Add/Remove Noise: Same settings as before

6. Move Tool, move the holly image to position in the corner of the brick accent

7. To finish the holly on the corner, let's add some berries.
Maximize !!!dkj_10_holly_berries
To activate the size of holly you wish to use, activate the Move Tool
Click on the berry image you want to activate the layer
Edit>Copy
Close original

8. Back to corner image
Edit>Paste as new layer

9. Move Tool, move the berry to position on the holly

10. To add more berries
Layer>Duplicate

11. Move to position where desired

12. Repeat Steps 10 & 11 above to add as many as you want in your corner

13. When all berries are positioned
Layers>Merge>Merge visible

14. Save this image as a .pspimage or .png to folder of choice

Our corner accent is ready. On to the tag/header

TAG/HEADER

1. Maximize JC_ DGelsinger-Santa

2. Edit>Copy

3. Edit>Paste as new image

4. Image>Resize: Longest side: 450
Pixels: selected
Lock Aspect Ratio: Checked
Resize all layers: Checked

5. Image>Canvas Size
Width: 450
Height: 450
Center: Selected

6. Layers>New raster layer

7. Layers>Arrange>Send to bottom

8. Material palette: Change FG & BG to original color choices
Change FG back to gradient

9. Flood fill tool
Flood fill with FG (gradient)

10. Activate top layer in layer palette
Layers>Duplicate

11. Turn off (click on eye icon) top layer (duplicate layer)

12. Activate middle layer (original mist layer)

13. Image>Resize
Percent: Selected
Width & Height: 125
Resize all layers: UNchecked

14. Layers>Properties; Change Blend mode: Screen

15. Effects>Edge Effects>Enhance

16. Activate bottom layer in layer palette

17. Adjust>Blur>Gaussian Blur: 35

18. Effects>Image Effects>Seamless Tiling: Default settings

19. Open top layer (click on eye icon)
Click on layer to activate

20. Effects>Image Effects>Offset: 15, -10, Custom: Checked, Transparent: Checked

21. Adjust>Add/Remove Noise>Add noise
Gaussian: Checked
Noise: 15
Monochrome: Checked

22. Layers>Merge>Merge All (Flatten)

23. Image>Add borders:
Symmetric: Checked
Left: 2, Top, Right & Bottom will self adjust
Color: BG

24. Image>Add borders
Same settings, only change color: FG

25. Image>Add borders
Same settings, only change color: BG

26. Effects>Plugins>Bordermania>Frame #2: 6, 6, 29, 87, Bevel: Checked, Notch Corners: Checked

27. Image>Add borders:
Symmetric: Checked
Left: 35, Top, Right & Bottom will self adjust
Color: FG

28. Magic Wand inside new border

29. Material Palette: Change BG to pattern, then select the pattern we created at the start of the tutorial.
Angle: 134, Scale: 57

30. Flood fill the selection with BG (pattern)

31. Selections>Float

32. Effects>3D Effects>Cutout: 0, 0, 90, 15, black, Unchecked

33. Selections>Defloat

34. Selections>Contract: 14

35. Effects>Plugins>Bordermania>Frame #2: same settings as before

36. Effects>3D Effects>Drop Shadow: 2, 2, 65, 1, Black, Unchecked

37. Repeat Drop shadow, changing the Vertical & Horizontal: -2 (minus 2)

38. Selections>Select None

39. Image>Add borders:
Symmetric: Checked
Left: 2, Top, Right & Bottom will self adjust
Color: BG

40. Image>Add borders
Same settings, only change color: FG

41. Image>Add borders
Same settings, only change color: BG

42. Effects>Plugins>Bordermania>Frame #2: 6, 6, 29, 87, Bevel: Checked, Notch Corners: Checked

43. Maximize Corner Accent we created before
Edit>Copy
If you have not saved at this point, this image, and wish to use for future items, do so now
Close original

44. Back to Tag/Header image
Edit>Paste as new layer

45. Image>Resize
Percent: Selected
Width & Height: 60
Resize all layers: Unchecked

46. Move tool, move to position in top left corner of inner frame

47. Effects>3D Effects>Drop Shadow: 2, 2, 65, 1, Black, Unchecked

48. Effects>Plugins>Simple>Top Left Mirror

49. (Optional) I added a 2nd set of corners to the outer frame, which I resize 35%

50. Layers>New raster layer

51. Add watermark

52. Add any text you wish to add

53. Layers>Merge>Merge all (flatten)

54. Image>Resize to desired use (ie., Header around 500 pixels, and tags around 350 pixels)

55. Jpeg optimize and save. Compression at 20 works fine.


I hope you have enjoyed this tutorial, and thank you for trying it.
If so, feel free to leave a comment, they are nice to see but not required.


LEGAL INFO:
This tutorial was written and designed by Deborah and is made using teaching and tips gained from the web and PSP, Animation Shop, and the other programs used, the programs listed Help feature; and is my own creation.
Any resemblance to other tutorials available is coincidental.
Please do not share this tutorial or to place it on any web site without my written permission.
Please do not translate this tutorial into any other language without my written permission: kay2ndjackson3@gmail.com.
If sharing, please direct to my blog site at: http://deborahscornerincyberspace.blogspot.com/

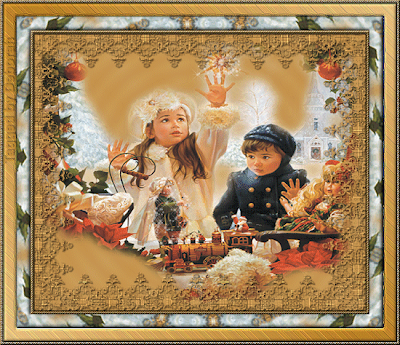
Christmas Wish

Christmas Wish
by Deborah in NC


Supplies Needed: (here)
PSP (written in PSP X3, will work in other versions)
-JM_achristmaswish_Deja10.9.05
-goldbead
-ts_mask58
-winni.texture.002


Plugins (optional)
Xenofex 2>Constellation

Preparation
Install Xenofex 2 into Plugins folder

Place goldbead in Pattern Folder for PSP

Place winni.texture.002 in Texture Folder for PSP

Open PSP

Open ts_mask58 in PSP & minimize

Open JM_achristmaswish_Deja10.9.05 in PSP
Dropper Tool, select a light color for your Material Palette Foreground (FG) color (I used #e8c382)
Dropper Tool, select a medium color for your Material Palette Background (BG) color (I used #b87d22)
Edit>Copy
Minimize

Material Palette, change FG to Foreground-Background gradient
Settings:
Angle: 45
Repeats: 1
Invert: Unchecked
Linear: Selected

Material Palette, change BG to Pattern, select: goldbead
Settings:
Angle: 0
Scale: 80

Method

Image>New
Settings:
Pixels: Selected
Width: 600
Height: 500
Raster & Transparent: Checked

Flood fill tool
Settings:
Match mode: None
Use all layers/Sample Merged: Unchecked
Blend Mode: Normal
Opacity: 100

Flood fill image with FG (gradient)

Selections>Select All

Edit>Paste into selection

Selections>Select None

Effects>Image Effects>Seamless Tiling: Default settings

Adjust>Blur>Gaussian Blur: 35

Effects>Reflection Effects>Kaleidoscope: Use the Random button to select one that works for you

Layers>Duplicate

Effects>Texture Effects>Texture
Settings:
winni.texture.002
100, 0, 1, 0, 0, white, 315, 50, 30

Image>Rotate Left (Rotate Counterclockwise)

Effects>Texture Effects>Texture
Settings: as before

Image>Rotate Right (Rotate Clockwise)

Layers>New mask layer>From image
Settings:
ts_mask58
Source Luminance: Checked
Invert mask date: UNchecked

Layers>Merge>Merge Group

Effects>3D Effects>Drop Shadow
Settings: 2, 2, 80, 2, black, Unchecked

Selections>Select All

Selections>Modify>Contract: 15

Layers>New Raster Layer

Edit>Paste into selection (tube image)

Selections>Select None

Layers>Arrange>Move Down (so mist layer is below the mask layer in Layer Palette)

Layers>Duplicate (this will make our misted image darker)

Layers>Merge>Merge all (Flatten)

Image>Add Border
Settings:
Symmetric: Checked
Left: 5
Color: a color not in your image edge (I used white)

Magic Wand
Settings:
Mode: Add (Shift)
Match Mode: RGB Value
Tolerance: 0
Use all layers (Sample merged): Unchecked
Contiguous: Checked
Feather: 0
Anti-alias: Checked
Outside: Selected

Magic wand new border

Flood fill inside selection with BG (pattern)

Effects>3D Effects>Inner Bevel
Settings:
Bevel: #2, 8
Image from top to bottom: 5, 3, 0, 0
Light from top to bottom: white, 315, 50, 30

Effects>3D Effects>Drop Shadow
Settings: as before

Effects>3D Effects>Drop Shadow
Settings: Change Vertical & Horizontal: -2 (minus 2)

Adjust>Sharpness>Sharpen

Selections>Select None

Image>Add Border
Change Left: 25

Magic Wand inside new border

Flood fill with FG (gradient)

Effects>Reflections Effects>Kaleidoscope
Settings:
Image Area from top to bottom: -91, 22, 285, 25
Kaleidoscope Settings from top to bottom: 18, 3, 25
Edge Mode: Color: Checked, Color: #9af5c7

Effects>3D Effects>Cutout
Settings: 0, 0, 100, 15, black, unchecked

Effects>3D Effects>Inner Bevel
Settings: as before

Selections>Select None

Image>Add Border: as before

Magic Wand new border

Flood fill with FG (gradient)

Effects>Texture Effects>Soft Plastic
Settings:
Relief from top to bottom: 10, 100, 128
Lighting from top to bottom: 45, Color: BG color

Effects>Edge Effects>Enhance

Effects>3D Effects>Inner Bevel
Settings: as before

Selections>Select None

Image>Add Border
Change Left: 5

Magic Wand new border

Flood fill with BG (Pattern)

Effects>3D Effects>Inner Bevel
Settings: as before

Adjust>Sharpness>Sharpen

Effects>3D Effects>Drop Shadow
Settings: Change Vertical & Horizontal: -2 (minus 2)

Effects>3D Effects>Drop Shadow
Settings: Change Vertical & Horizontal: 2

Selections>Select None

Layers>New raster layer

Add watermark

Layers>Merge>Merge all (flatten)

OPTIONAL (Animation)

Freehand Selection Tool
Settings:
Selection type: Point to point
Mode: Add (Shift)
Feather: 0
Smoothing: 20
Anti-alias: checked

Lasso around the Star at the top that the girl is reaching for, close to the star, but it does not have to be exact.

Layers>Duplicate

Layer>Duplicate

Turn off "Copy of Background" layer in Layer Palette

Turn off "Copy (2) of Background" layer in Layer Palette

Activate "Background" layer

Effects>Plugins>Alien Skin Xenofex 2
Settings:
Star Size (pixels): 5.51
Size Variation: 50
Edge Star Density: 50
Overall Star Density: 25
Overdrive: 50
Twinkle Amount: 75
Twinkle Rotation: 45
Background fill: Keep original image: Checked
Random Seed: 1

Turn on "Copy of Background" layer in Layer Palette

Effects>Plugins>Alien Skin Xenofex 2
Settings:
Tap the Random Seed button once

Turn on "Copy (2) of Background" layer in Layer Palette

Effects>Plugins>Alien Skin Xenofex 2
Settings:
Tap the Random Seed button once

Selections>Select None

Freehand around the Soldier toy in the window, again it does not have to be exact, just as close as you can get

Turn off "Copy of Background" layer in Layer Palette

Turn off "Copy (2) of Background" layer in Layer Palette

Activate "Background" layer

Effects>Plugins>Alien Skin Xenofex 2
Settings:
Tap the Random Seed button once

Turn on "Copy of Background" layer in Layer Palette

Effects>Plugins>Alien Skin Xenofex 2
Settings:
Tap the Random Seed button once

Turn on "Copy (2) of Background" layer in Layer Palette

Effects>Plugins>Alien Skin Xenofex 2
Settings:
Tap the Random Seed button once

Selections>Select None

Make sure all layers in Layer Palette are turned on

File>Save As.....
Save in: Select folder of choice
File Name: Name your image
Save as type: PSP Animation Shop (*.psp)

Open Animation Shop

File>Open
Locate the image you just saved from PSP
Open

Edit>Select All

Here you can add text if you want
File>New: Width: 600, Height 200, Transparent: Checked

Alpha Tool (A symbol in the tool bar)

Click inside your image to activate the Text Tool

Select the Font you want
Select the Size you want
Click in the bottom white box, hightlight any text that is already there, and type in your desired text
It will appear in the gray box above what the text will look like
Make any changes to your settings if you do not like

Animation>Frame Properties: 25

Animation>Resize Animation
Pixel Size: checked
Width: choose the size that will work best for your use of the image (I used 550, since I will be creating an IM Letter with it)
Height: will self adjust
Resize Type: Bicubic resample
Maintain aspect ratio of: Checked, let settings self adjust
OK

View>Animation

If you like what you have, we are ready to save
If not, undo the resizing, then repeat for size that works best for you
(If you undo and resize, make sure you View>Animation before moving to next step)

File>Save as....
Save in: Folder of choice
File Name: Name of choice
Save as type: CompuServe Graphics Interchange (*.gif)
Save

Next

Next

Next

Finish

You are done!


I hope you have enjoyed this tutorial, and thank you for trying it. If so, feel free to leave a comment, they are nice to see but not required.


LEGAL INFO:
This tutorial was written and designed by Deborah and is made using teaching and tips gained from the web and PSP, Animation Shop, and the other programs used, the programs listed Help feature; and is my own creation.
Any resemblance to other tutorials available is coincidental.
Please do not share this tutorial or to place it on any web site without my written permission.
Please do not translate this tutorial into any other language without my written permission: kay2ndjackson3@gmail.com.
If sharing, please direct to my blog site at: http://deborahscornerincyberspace.blogspot.com/

Tuesday, December 7, 2010

DCIC Reindeer DAZ Posers

Here are all the DAZ poser Reindeer that were made to go along with the DCIC Christmas 2010 scrap kit. In all there are 40 posers; 16 Reindeer & 24 Reindeer w/sleigh. The preview below shows 5 of the different reindeer in the pack, 2 are the poses available, and the sleighs attached to each of the 8 reindeer images. I hope you enjoy them.


Pack is available for download from 4-shared.

4-Shared - here

Huggers,

Deborah


Santa DAZ Posers

Here is the full Santa Pack to go with the DCIC Christmas 2010 scrap kit. The pack contains 16 Santa image, 4 different poses and 4 different Toy Bag colors.


Available for download at 4-shared.

4-shared-here

Enjoy!!!

Deborah

Jolly Christmas

Jolly Christmas


Supplies Needed:
PSP (written in PSP X3, will work in other versions)
DCIC Christmas 2010 scrap kit by Deborah found here
Select from the kit:
2 papers of choice (I used DCIC Christmas 2010 Paper004 & DCIC Christmas 2010 Paper013)
1 of the Reindeer with sleigh images (I used DCIC Christmas2010 Blitzen w Sleigh 002)
1 of the Santa with red bag (I used DCIC Christmas2010 Santa 002 - Red)
1 of the present images (I used DCIC Christmas2010 Present 001)
DCIC Christmas2010 Tree 001
Optional: I chose to use several of the toy images from the kit to put in the bottom left corner. The ones I chose to use are listed below in Step 18.


Plugins I used:
Filters Unlimited 2.0>Edges, Square


Preparation:
Select & maximize the paper you are going to use for your background (I used DCIC Christmas 2010 Paper004)
Edit>Copy
Close the original

Method:
1. File>New: Width & Height: 600, Raster & Transparent: Checked
This will be our working copy
Selections>Select All
Edit>Paste into selection

2. Selections>Modify>Contract: 20

3. Maximize the 2nd paper of choice
Dropper Tool: Place over the color of the background you selected, and right click to set as your Background color in the Material Palette
Edit>Copy
Close the original

4. Back to working copy
Layers>New raster layer
Edit>Paste into selection
Selections>Select None

5. Effects>Plugins>Filters Unlimited 2.0>Edges, Square>Square Edge 09
Effects>3D Effects>Drop Shadow: 2, 2, 65, 2, Black, Unchecked
Effects>3D Effects>Drop Shadow: -2 (minus 2), -2 (minus 2), 65, 2, Black, Unchecked

6. Maximize DCIC Christmas2010 Tree 001
Edit>Copy
Close the original

7. Back to working copy
Edit>Paste as new layer
Image>Resize: Percent: Selected, Width: 60, Height will self adjust, Resize all layers: Unchecked
Adjust>Sharpness>Sharpen

8. Move Tool, Move to top left corner of inner paper (see my header for placement)
Effects>3D Effects>Drop Shadow: 7, 6, 65, 9, Black, Unchecked

9. Maximize your Reindeer with Sleigh image (Mine was DCIC Christmas2010 Blitzen w Sleigh 002)
Edit>Copy
Close the original

10. Back to working copy
Edit>Paste as new layer
Image>Resize: Percent: Selected, Width: 68, Height will self adjust, Resize all layers: Unchecked
Adjust>Sharpness>Sharpen

11. You may want to move this image down a bit, I waited until I had the rest of my images placed, and adjusted at the end
Effects>3D Effects>Drop Shadow: 7, 6, 65, 9, Black, Unchecked

12. Maximize the Santa with red bag image you selected (I used I used DCIC Christmas2010 Santa 002 - Red)
Edit>Copy
Close the original

13. Back to working copy
Edit>Paste as new layer
Image>Resize: Percent: Selected, Width: 55, Height will self adjust, Resize all layers: Unchecked
Adjust>Sharpness>Sharpen

14. Move Tool: Move to bottom right corner area (see my header for placement)
Effects>3D Effects>Drop Shadow: 7, 6, 65, 9, Black, Unchecked

15. Maximize the presents image you chose (I used DCIC Christmas2010 Present 001)
Edit>Copy
Close the original

16. Back to working copy
Edit>Paste as new layer
Image>Resize: Percent: Selected, Width: 35, Height will self adjust, Resize all layers: Unchecked
Adjust>Sharpness>Sharpen

17. Move Tool: Move to bottom left corner area (see my header for placement)
Effects>3D Effects>Drop Shadow: 7, 6, 65, 9, Black, Unchecked

18. At this point I chose a few of the toys that were included in the scrap kit and placed them in my image, resizing and drop shadowing
The ones I used were:
DCIC Christmas2010 Toy 004 (this one I moved below the presents layer)
DCIC Christmas2010 Toy 007 (drum)
DCIC Christmas2010 Toy 014 (teddy bear)

19. Once all your elements are added to your image, use the move tool to place how you like.
When you are done,
Layers>Merge>Merge All (Flatten)

20. Image>Add Borders: 2, Color: A color of choice (I clicked in the color selector box, then placed my cursor on the image background (first paper), and selected a color. Then I used the L Option and lowered the Lightness to make my color choice darker)

21. The main reason I left the top right corner empty was to add text to my image.
For the text, I used a gold pattern as my background color, and the same dark color I did my border above in for the FG color (the Stroke of text application was 1)
Add text if you like

22. New Raster layer
Add watermark
Layers>Merge>Merge All (Flatten)

23. If you are making a IncrediMail Letter (aka Stat), use the paper you chose for your background layer
Effects>Image Effects>Seamless Tile: Default settings
Layers>Properties and lower to opacity so your background is text friendly


I hope you have enjoyed this tutorial, and thank you for trying it. If so, feel free to leave a comment, they are nice to see but not required.


LEGAL INFO:
This tutorial was written and designed by Deborah and is made using teaching and tips gained from the web and PSP, Animation Shop, and the other programs used, the programs listed Help feature; and is my own creation.
Any resemblance to other tutorials available is coincidental.
Please do not share this tutorial or to place it on any web site without my written permission.
Please do not translate this tutorial into any other language without my written permission: kay2ndjackson3@gmail.com.
If sharing, please direct to my blog site at: http://deborahscornerincyberspace.blogspot.com/
Dated: December 5, 2010