by Deborah in NC

PDF Version of this tutorial can be found here
Supplies Needed:
PSP (written in PSP X2, tested in 9 & X, will work in other versions with a few modifications)
Font of choice, I used Avalon Medium a PTU font found here
Supplies zip file here includes:
-007_verloop8a-ca
-1024-flower (by LaManouche other work available here or here)
-1163-luzcristina (by Luz Cristina other work available here)
Material palette: Select a light color of choice, your favorite color and set as your FG color. For BG change to pattern and open a pattern of choice or use mine from the zip (Settings for mine were Angle 68, Scale: 100)
1. Open 1024-flower. Duplicate image, close original.
2. Delete the watermark layer
3. Colorize to FG color
4. Duplicate Image (Shift + D). Minimize one copy
5. Open 1163-luzcristina.
6. Edit>Copy
7. Close original
8. Edit>Paste>Paste as a new layer
9. Move to bottom right corner of image
10. Layers>New Raster layer
11. Layers>Arrange>Send to bottom
12. Flood fill with FG
13. Selections>Select All
14. Maximize 2nd copy of flower, Edit>Copy, minimize copy
15. Edit>Paste>Paste into selection. Select None.
16. Effects>Image Effects>Seamless tiling: default settings
17. Adjust>Blur>Gaussian Blur: 10
18. Layer palette, activate the flower tube layer. Layers>Properties: Blend Mode: Soft Light
19. Layer palette, activate the woman and child layer. Layers>Properties: Blend Mode: Luminance (Legacy)
20. Layers>Merge>Merge all (flatten)
21. Selections>Select all
22. Selections>Modify>Contract: 3
23. Selections>Invert
24. Layers>New raster layer
25. Flood fill with BG (pattern)
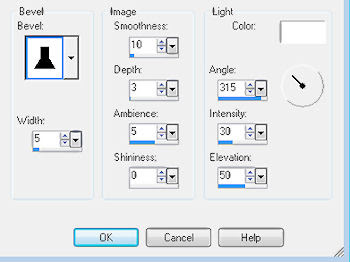
26. Effects>3D Effects>Inner Bevel: #12, 5, 10, 3, 5, 0, white, 315, 30, 50

27. Selections>Select None
28. Effects>3D Effects>Drop Shadow: 0, 0, 100, 15, black, Unchecked
29. Repeat Drop Shadow
30. Layers>Merge>Merge Visible
31. New Image: Width: 1600, Height: 900, pixels, Raster Transparent (we are making large so that when we resize you will have a nice clear image)
32. Flood fill with FG color
33. Selections>Select All
34. Maximize 2nd flower image. Edit>Copy. Close flower image.
35. Edit>Paste>Paste into selection
36. Selections>Select None
37. Effects>Image Effects>Seamless tile: deafault
38. Layers>Properties: lower opacity 50 to 70, your choice so that the image is pale in color
39. Layers>Merge>Merge All
40. Activate image created above. Edit>Copy. Minimize if you want to use as a header or tag, otherwise you can close the image
41. Edit>Paste>Paste as a new layer
42. Mover tool to position where you want the image to be. Mine is in the middle right. Be sure to leave space on the sides of about 20-30 pixels
43. Layers>Properties>Blend mode: Luminance (Legacy)
44. Effects>3D Effects>Drop Shadow: as before
45. Text Tool: Font of choice (I used Avalon), Size: (2010 about double the size of the other text, New about 50% of 2010, rest of text I used 72), Bold: Selected, Centered: Selected, Vector: selected, Width: 0) and add text
2010, New..., Year...Beginnings...,Hopes...Dreams...
46. Position Text as desired
47. Layers>Convert to Raster layer
48. Effects>3D Effects>Drop Shadow: 2, 2, 85, 5, black, Unchecked
49. Layers>New raster layer
50. Add watermark
51. Layers>Merge>Merge All
52. Resize to your monitor size (if necessary, Lock Aspect Ratio: Unchecked)
53. jpeg and save
That's it, you are done. You now have a desktop to ring in the New Year and Resolutions for the New Year.
I hope you have enjoyed this tutorial, and thank you for trying it. If so, feel free to leave a comment, they are nice to see but not required.
LEGAL INFO:
This tutorial was written and designed by Deborah and is made using teaching and tips gained from the web and PSP, Animation Shop, and the other programs used, the programs listed Help feature; and is my own creation. Any resemblance to other tutorials available is coincidental.
Please do not share this tutorial or to place it on any web site without my written permission. Please do not translate this tutorial into any other language without my written permission: kay2ndjackson@gmail.com. If sharing, please direct to my blog site at: http://deborahscornerincyberspace.blogspot.com/


No comments:
Post a Comment