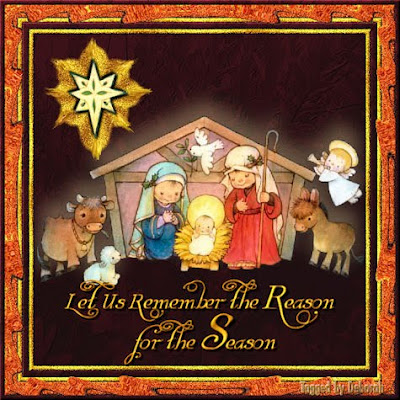
by Deborah in NC

PDF Version can be found here:
Supplies Needed:
PSP (written in PSP X2, will work in other versions)
-DCIC Cranberry Season Papers here
-Paper 20
-Paper of choice
Tubes here
-dkj_09_Reason_Season_121209
-dkj_09_Reason_Season_Star_121209
1. Open Paper 20 from DCIC Cranberry Season Papers.
2. Duplicate (Shift + D).
3. Minimize original.
4. The Duplicate image is our working copy.
5. Open dkj_09_Reason_Season_121209
6. Edit>Copy
7. Close original
8. Paste as a new layer
9.Image>Resize layer: 60%, Bicubic
10. Adjust>Add/Remove Noise>Moire Pattern Removal: Fine Details: 1, Remove Bands: 4
11. Effects>3D Effects>Drop Shadow: Vertical: -20, Horizontal: 0, Opacity: 20, Blur: 35, Color: #fce6a7, Shadow on new layer: UNchecked
12. Repeat Drop Shadow
13. Open dkj_09_Reason_Season_Star_121209
14. Edit>Copy
15. Close original
16. Paste as a new layer
17. Move to top left corner
18. Colorize if desired
19. Selections>Select All
20. Selections>Float
21. Selections>Defloat
22. Selections>Modify>Expand: 20
23. Layers>New raster layer
24. Layers>Arrange>Move Down
25. Material palette: change FG to #f8ca29 and BG to a15e00
26. Material palette: change FG to gradient Settings: Foreground/Background, Angle: 0, Repeats: 19, Radial: selected, Vertical & Horizontal: 50
27. Flood fill tool: Flood fill selection with FG (gradient)
28. Adjust>Add/Remove Noise>Add Noise: Gaussian: checked, Noise: 50, Monochrome: checked
29. Selections>Select None
30. Adjust>Blur>Blur More
31. Smudge Brush tool (settings: Round, Size: 15, Hardness: 50, Step: 10, Density: 35, Thickness: 100, Rotation: 0, Opacity: 100, All layers/Sample layers: UNchecked

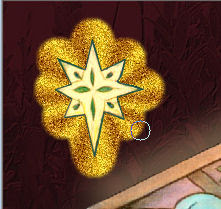
32. Place the smudge brush tool on the rounded edge as indicated here:

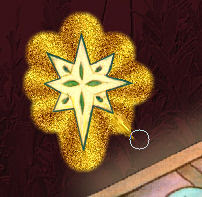
33. Click, hold and "flick" slightly to drag out from the edge, you should have something like this:

34. Repeat the smudge in the same place if needed to make it look like my example above
35. Move to the next rounded edge, and repeat the smudge as above.
36. Repeat smudge for remaining rounded edges
37. Activate the Star layer (top layer)
38. Effects>3D Effects>Drop Shadow: V&H: 3, Opacity: 100, Blur: 4, Color: black, Shadow new layer: Unchecked
39. Repeat Drop Shadow with this change only: V&H: -3
40. Layers>Merge>Merge All
41. Image>Add borders: 1, symmetric checked, Color: black
------------------------------
42.*1 - Image>Add borders: 7, symmetric, white
Magic Wand (settings: Add/Shift, RGB Value, Tolerance: 0, All layers: UNchecked, Contiguous: checked, Feather: 0, Anti-alias: checked, Outside: selected) inside new border
Flood fill with FG (gradient)
Effects>3D Effects>Inner Bevel: #1, 2, 0, 2, 0, 0, white, 315, 86, 20
Adjust>Add/Remove Noise>Add noise: as before
Select None
------------------------------
43. Image>Add border: 10, symmetric, white
44. Magic wand inside new border
45. Maximize DCIC Cranberry Season Paper 20
46. Edit>Copy
47. Reminimize
48. Image>Paste into selection
49. Effects>3D Effects>Inner Bevel: as before
50. Repeat *1 above
51. Image>Add border: 20, symmetric, white
52. Magic Wand inside new border
53. Select and open a 2nd paper of choice from DCIC Cranberry Season Papers
54. Edit>Copy
55. Close image
56. Image>Paste into selection
57. Effects>3D Effects>Inner bevel: as before only change color to FG
58. Adjust>Add/Remove Noise>Add Noise: as before
59. Effects>Distortion Effects>Ripple (Settings: Center offset - Horizontal: 50.00, Vertical: 50 / Settings - Amplitude: 10, Wavelength: 40 / Edge Mode: Transparent: checked
60. Selections>Select None
61. Image>Add border: 7, symmetric, white
62. Magic wand inside new border
63. Maximize DCIC Cranberry Season Paper 20
64. Edit>Copy
65. Close
66. Image>Paste into selection
67. Effects>3D Effects>Inner Bevel: as before, only change color back to white
68. Selections>Select None
69. Add text as desired
70. Resize & save for desired use.
That's it, you are done!
I hope you have enjoyed this tutorial, and thank you for trying it. If so, feel free to leave a comment, they are nice to see but not required.
LEGAL INFO:
This tutorial was written and designed by Deborah and is made using teaching and tips gained from the web and PSP, Animation Shop, and the other programs used, the programs listed Help feature; and is my own creation. Any resemblance to other tutorials available is coincidental.
Please do not share this tutorial or to place it on any web site without my written permission. Please do not translate this tutorial into any other language without my written permission: kay2ndjackson@gmail.com. If sharing, please direct to my blog site at: http://deborahscornerincyberspace.blogspot.com/


A lovely design, thank you for the tut
ReplyDelete